Showing posts with label lights. Show all posts

Friday, 6 January 2017

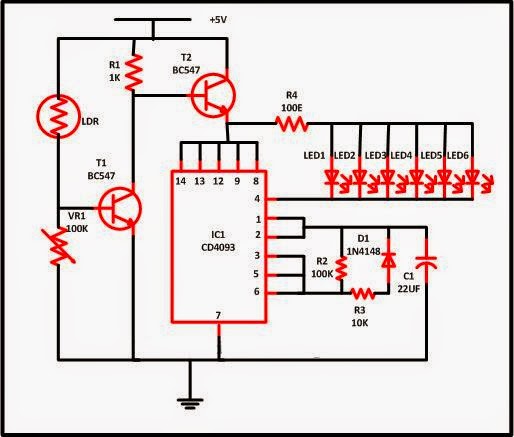
LED Christmas Lights Circuit

LED Christmas Lights Circuit
Christmas is known as the carnival of lights and every person decorates its house with multicolored lights which we normally purchase from the market. Did you ever have a thought of building your own Christmas lights, which is used to decorate own house or your own house holy place. This very easy circuit will assist you to develop your own decorative lights.The plus point of these circuits is that you did not require to take tension regarding the ON and OFF of the light. In the evening time, lights automatically become ON while in the morning, it becomes OFF. So it will save your electricity bill when you go away from your house.
Readmore → LED Christmas Lights Circuit

Lights Control for Model Cars Circuit Diagram


The author gave his partner a radio controlled (RC) model car as a gif t. She found it a lot of fun, but thought that adding realistic lights would be a definite improvement. So the author went back to his shed, plugged in his soldering iron, and set to work equipping the car with realistic indicators, headlights, tail lights and brake lights.

Lights Control for Model Cars Circuit Diagram

The basic idea was to tap into the signal from the radio control receiver and, with a bit of help from a microcontroller, simulate indicators using flashing yellow LEDs and brake lights using red LEDs. Further red LEDs are used for the tail lights, and white LEDs for the headlights. Connectors JP4 and JP5 (channel 0) are wired in parallel, as are JP6 and JP7 (channel 1), allowing the circuit to be inserted into the servo control cables for the steering and drive motor respectively. The ATtiny45 micro-controller takes power from the radio receiver via diode D1. T1 and T2 buffer the servo signals to protect IC1’s inputs from damage. 
IC1 analyses the PWM servo signals and gen-erates suitable outputs to switch the LEDs via the driver transistors. T3 drives the two left indicators (yellow), T4 the two right indica-tors, and T5 the brake LEDs (red). The red tail lights (JP2-8 and JP2-8) and the white head-lights (JP2-9 and JP2-10) are lit continuously. The brake lights are driven with a full 20 mA, so that they are noticeably brighter than the tail lights, which only receive 5 mA. If you wish to combine the functions of tail light and brake light, saving t wo red LEDs, sim-ply connect pin 10 of JP2 to pin 14 and pin 12 to pin 16. Then connect the two combined brake/tail LEDs either at JP2-5 and JP2-6 or at JP2-7 and JP2-8.

JP3 is provided to allow the use of a separate lighting supply. This can either be connected to an additional four-cell battery pack or to the main supply for the drive motor. The val-ues given for resistors R8 to R17 are suitable for use with a 4.8 V supply. JP2 can take the form of a 2x10 header.

As usual the sof t ware is available as a free download from the Elektor web pages accom-panying this article[1], and ready-programmed microcontrollers are also available. The microcontroller must be taught what servo signals correspond to left and right turns, and to full throttle and full braking. First connect the fin-ished circuit to the radio control electronics in the car, making sure everything is switched of f. Fit jumper JP1 to enable configuration mode, switch on the radio control transmit-ter, set all proportional controls to their cen-tre positions, and then switch on the receiver. The indicator LEDs should first flash on both sides. Then the car will indicate left for 3 s: during this time quickly turn the steering on the radio control transmitter fully to the left and the throt tle to full reverse (maximum braking).

Hold the controls in this position until the car starts to indicate right. Then set the controls to their opposite extremes and hold them there until both sides flash again. Now, if the car has an internal combustion engine (and so cannot go in reverse), keep the throttle control on full; if the car has an electric motor, set the throttle to full reverse. Hold this position while both sides are flashing. Configuration is now complete and JP1 can be removed. If you make a mistake during the configuration process, start again from the beginning.


Author: Manfred Stratmann - Copyright : Elektor

Readmore → Lights Control for Model Cars Circuit Diagram

Thursday, 22 December 2016

Lights Control for Model Cars Circuit Diagram


The author gave his partner a radio controlled (RC) model car as a gif t. She found it a lot of fun, but thought that adding realistic lights would be a definite improvement. So the author went back to his shed, plugged in his soldering iron, and set to work equipping the car with realistic indicators, headlights, tail lights and brake lights.

Lights Control for Model Cars Circuit Diagram

The basic idea was to tap into the signal from the radio control receiver and, with a bit of help from a microcontroller, simulate indicators using flashing yellow LEDs and brake lights using red LEDs. Further red LEDs are used for the tail lights, and white LEDs for the headlights. Connectors JP4 and JP5 (channel 0) are wired in parallel, as are JP6 and JP7 (channel 1), allowing the circuit to be inserted into the servo control cables for the steering and drive motor respectively. The ATtiny45 micro-controller takes power from the radio receiver via diode D1. T1 and T2 buffer the servo signals to protect IC1’s inputs from damage. 
IC1 analyses the PWM servo signals and gen-erates suitable outputs to switch the LEDs via the driver transistors. T3 drives the two left indicators (yellow), T4 the two right indica-tors, and T5 the brake LEDs (red). The red tail lights (JP2-8 and JP2-8) and the white head-lights (JP2-9 and JP2-10) are lit continuously. The brake lights are driven with a full 20 mA, so that they are noticeably brighter than the tail lights, which only receive 5 mA. If you wish to combine the functions of tail light and brake light, saving t wo red LEDs, sim-ply connect pin 10 of JP2 to pin 14 and pin 12 to pin 16. Then connect the two combined brake/tail LEDs either at JP2-5 and JP2-6 or at JP2-7 and JP2-8.

JP3 is provided to allow the use of a separate lighting supply. This can either be connected to an additional four-cell battery pack or to the main supply for the drive motor. The val-ues given for resistors R8 to R17 are suitable for use with a 4.8 V supply. JP2 can take the form of a 2x10 header.

As usual the sof t ware is available as a free download from the Elektor web pages accom-panying this article[1], and ready-programmed microcontrollers are also available. The microcontroller must be taught what servo signals correspond to left and right turns, and to full throttle and full braking. First connect the fin-ished circuit to the radio control electronics in the car, making sure everything is switched of f. Fit jumper JP1 to enable configuration mode, switch on the radio control transmit-ter, set all proportional controls to their cen-tre positions, and then switch on the receiver. The indicator LEDs should first flash on both sides. Then the car will indicate left for 3 s: during this time quickly turn the steering on the radio control transmitter fully to the left and the throt tle to full reverse (maximum braking).

Hold the controls in this position until the car starts to indicate right. Then set the controls to their opposite extremes and hold them there until both sides flash again. Now, if the car has an internal combustion engine (and so cannot go in reverse), keep the throttle control on full; if the car has an electric motor, set the throttle to full reverse. Hold this position while both sides are flashing. Configuration is now complete and JP1 can be removed. If you make a mistake during the configuration process, start again from the beginning.
Author: Manfred Stratmann - Copyright : Elektor

Readmore → Lights Control for Model Cars Circuit Diagram

Wednesday, 30 November 2016

4 Way Traffic Lights


This circuit produces traffic lights for a "4-way" intersection. The seemingly complex  wiring to illuminate the lights is shown to be very simple.
Readmore → 4 Way Traffic Lights

Sunday, 4 September 2016

Free Wiring diagram trailer lights 7 pin south africa


Useful Wiring diagram trailer lights 7 pin south africa


Caravan electrical questions - caravan advice, Aug 16, 2016: lights not working while towing new by: edith anonymous hi was wondering if anyone can help i have a caravan which i bought 2 years ago it is a sterling.
Home [www.riverfrontproject.org], The colorado riverfront trail system celebrates and preserves the cottonwood groves, wetlands, cattail marshes, gravel bars and islands ofthe colorado (originally the.
Edotek uk | chemical consultants | analysis | materials, Edotek is a scientific consultancy which provides technical assistance to industry and other agencies helping them to solve problems in the areas of chemistry and.

Bmw cars. parts and spares for old bmws - old classic car, Listed below are all the adverts placed for bmws within the modern car parts section on occ, pulling together ads that have been placed on the existing specific bmw.
Dasal el salvador | llantas usadas, llantas nuevas y, Dasal el salvador empresa 100% salvadoreña que exporta contenedores con llanta usada a centroamérica.
Mitsubishi cars. parts and spares for old mitsubishis, Special feature: have you tried ebay for mitsubishi spare parts? the window below gives a snapshot of the parts for these vehicles presently running on there and due.

nowadays i came across the particular Wiring diagram trailer lights 7 pin south africa
Find here about Wiring diagram trailer lights 7 pin south africa
and your search ends here below is information relating to Wiring diagram trailer lights 7 pin south africa
a bit review

illustration Wiring diagram trailer lights 7 pin south africa


TRAILER LIGHT WIRING - TYPICAL TRAILER LIGHT WIRING DIAGRAM

TRAILER LIGHT WIRING - TYPICAL TRAILER LIGHT WIRING DIAGRAM

trailerTail lights (running lights) Fog light This goesconverter

TrailerTail lights (running lights) Fog light This goesconverter

Towhitch wiring - 4x4 Hilux Forum

Towhitch wiring - 4x4 Hilux Forum

Wiring Adapter Needed for Towing 5th Wheel Trailers with a Kenworth

Wiring Adapter Needed for Towing 5th Wheel Trailers with a Kenworth

Trailer Wiring Diagrams, Trailer Wiring Information, Trailer Wiring

Trailer Wiring Diagrams, Trailer Wiring Information, Trailer Wiring

dodge ram trailer wiring diagram 1969 vw beetle wiring diagram hei

Dodge ram trailer wiring diagram 1969 vw beetle wiring diagram hei

Erde & Daxara Plug Wiring, trailers, spares & accessories

Erde & Daxara Plug Wiring, trailers, spares & accessories


identify Wiring diagram trailer lights 7 pin south africa
whose plenteous individual quest individual happen fortunate because ferret out Wiring diagram trailer lights 7 pin south africa


Well I really hope Wiring diagram trailer lights 7 pin south africa
share useful for you even if you are a beginner in this field


Readmore → Free Wiring diagram trailer lights 7 pin south africa

Saturday, 3 September 2016

Where to get Wiring diagram for utility trailer lights


Learn Wiring diagram for utility trailer lights


Trailer wiring diagram light plug brakes hitch 7 pin way, Trailer wiring diagram, trailer brake light plug wiring diagram, electric trailer brakes, hitch lights, 7 pin, 7 way, 7 wire, 6 pin, 6 way, 6 wire, 4 pin, 4 way, 4.
Trailer wiring diagram - accessconnect.com, Faq's and trailer wiring problems. when i have the headlights on and apply the brakes, all the lights on my trailer go out. you may have a weak ground problem..
Utility trailer 03 - 4 pin trailer wiring and diagram, This is a short video series of the steps that i have taken to refurbish and old utility trailer that was designed and built by my father. this is part 3.

Trailer lights & wiring - page 1 - champion trailers, Trailer lights are an important part of trailer safety. department of transportation mandates that all trailers on the road have to be equipped with trailer lights..
Wiring trailer lights - youtube, Installing a trailer wiring package : how to connect the white ground wire of a trailer wiring package - duration: 2:44. expertvillage 138,835 views.
Trailer wiring diagrams | etrailer, Trailer wiring trailer wiring trailer trailer right turn &.

these days i discovered the actual Wiring diagram for utility trailer lights
Finding results for Wiring diagram for utility trailer lights
and your search ends here below is information relating to Wiring diagram for utility trailer lights
a bit review

Pictures Wiring diagram for utility trailer lights
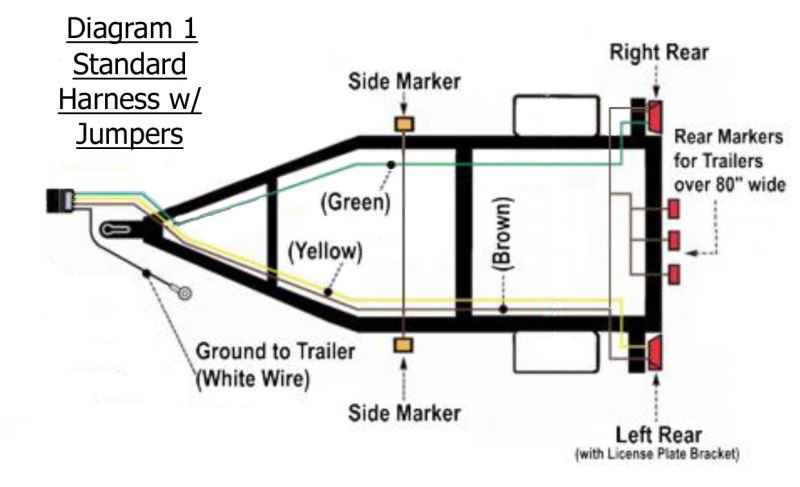


Utility Trailer Light Wiring Diagram and Required Parts | etrailer.com

Utility Trailer Light Wiring Diagram and Required Parts | etrailer.com

 Trailer 7 Pin Wiring Diagram | Get Free Image About Wiring Diagram

Trailer 7 Pin Wiring Diagram | Get Free Image About Wiring Diagram

trailer wiring diagram trailer wiring diagram

Trailer wiring diagram trailer wiring diagram

Boat Trailer Wiring Diagram on Trailer Wiring Electrical Connections

Boat Trailer Wiring Diagram on Trailer Wiring Electrical Connections

Trailer Wiring Diagram Download Trailer Wiring Diagram is

Trailer Wiring Diagram Download Trailer Wiring Diagram is

 Pin Trailer Wiring Diagram. on 7 pin utility trailer wiring diagram

Pin Trailer Wiring Diagram. on 7 pin utility trailer wiring diagram

Wiring Services | Council Hitch

Wiring Services | Council Hitch


pick up Wiring diagram for utility trailer lights
what many mortal search man happen well because devise Wiring diagram for utility trailer lights


Well I really hope Wiring diagram for utility trailer lights
article useful for you even if you are a beginner though


Readmore → Where to get Wiring diagram for utility trailer lights